
Custom Sporty, LTR #422
It was in dire need of a makeover, but not even Nathan envisioned an outcome like this…
Feature: Del Hickey
Simon Butler has always built bikes over the years just for himself and was never interested in projects for other people because not only is it time consuming, but most non-bike builders don’t understand what’s actually involved. As Simon explains it, in the majority of cases, many customers question all the costs and are constantly changing their mind, in other words, it can be a real pain in the arse if patience isn’t one of your strong points. That’s why Simon always found it easier to build a bike in his own time and to his own design, and if he decides to sell it down the line, he knows that they’re buying the finished product without all the hassle.
Well, like many builders, Simon spent most of the Covid 19 lockdown in his workshop, and in that time managed to churn out two bikes, for himself of course, with the first being a homage to two strokes of his youth; a Suzuki GT750 engine in a Yamaha FZR 1000 frame with modern running gear. Then he finished his Billet Twin Cam complete with hand-built frame, which recently won Best Engineering in the Back Street Heroes Biker Build Off and was displayed on their stand at the NEC Motorcycle Live Show.
A few weeks later he got a phone call from a bloke by the name of Nathan who explained, “I’ve got a bike, I’m not happy with it, its leaking oil and doesn’t look how I want it to look.” He further explained that he heard that Simon was a reputable bike builder who could resurrect his custom to the way he wanted it. So after more discussion, Simon explained the best solution would be for him to personally look at the bike, so he went to Nathan’s property and amongst a few custom cars and other bikes, he found the very sorry looking 883 Hardtail bobber in a corner of the garage, which was the project that Nathan wanted him to work on.
The bike was originally built and sold back in 2012 by Chris Woodage and his pal ‘Mad Dog’ Williams R.I.P. who did all the hard bits and died far too young. The history of the bike from then till now is unknown, what was known is that it unfortunately ended up in an extremely sorry state. Not only had it been tinkered with by some inexperienced builders, but it also had some less than satisfactory modifications done that needed putting right. So, a couple of days later it arrived at Simon’s workshop where he spent a few days just looking over at what was in front of him. And after working out what he could re-use and what he had to make again from scratch, he went to work.
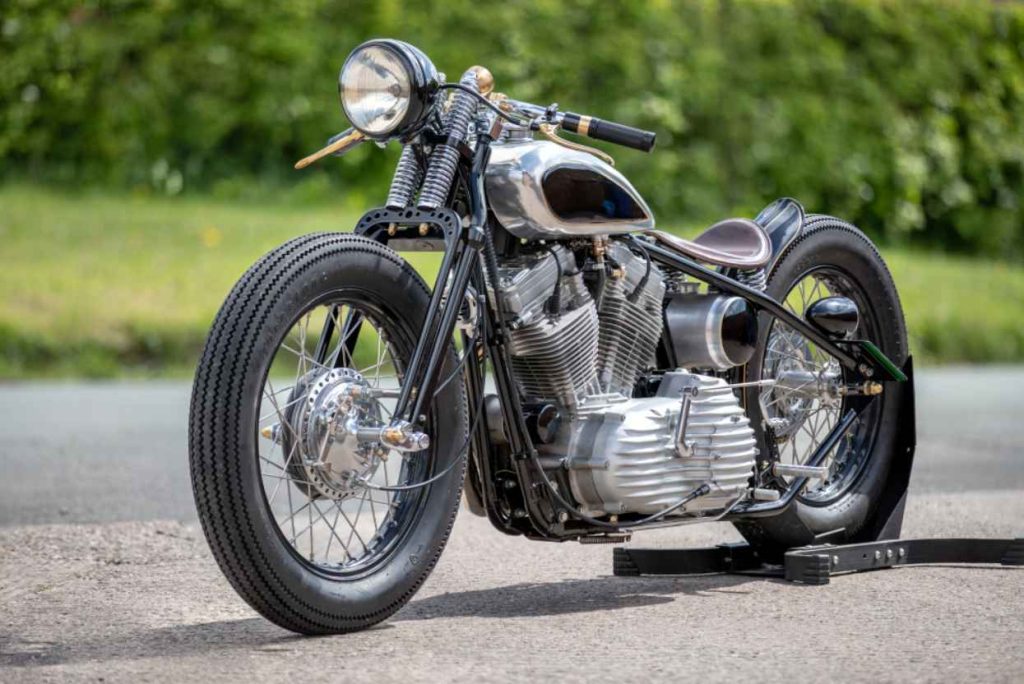
Without needing to inspect further, he was well aware the engine required a rebuild as it was leaking fluid over the place. To make matters worse, the oil tank was ill fitted and was rubbing against the frame while the rear guard was all out of shape as well. The chrome on the springers had all been rubbed down to the nickel underneath, the electrics had no fuses inline at all, the rear brake was a disc set up while the front was fitted with a drum, the list went on and on.
So with the main instructions from Nathan being that he liked the colours and loved the fuel tank, it meant Simon could do anything as long as he didn’t change the colours or the tank, and it also had to look old school. With all that in mind the bike was completely stripped along with the engine being removed and put to one side. The forks were also pulled apart while all the chrome work was sent to the platers, and as this was going to take 12 weeks to complete, it allowed Simon the time to refabricate the rest of the bike, so he started to dry build it as a blank canvas.
The oil tank was the first thing to tackle closely followed by the rear wheel, which didn’t look right with a disc on the rear for the look they were attempting to achieve, so Simon unlaced it and found that a Triumph pre-unit hub and drum brake assembly fitted the bill, so one was sourced and re-laced back in. Next he had to re-make the spacers, which needed to be done by some great guess work as he’d already taken out the engine. Even so, he knew he had to get it bang on so he could line up the rear guard with no visible fixings. Once he was happy with that, he then needed to figure out a wiring loom as invisible as possible along with the issue of where to put the Motogadget unit. He needed access to it but didn’t want it on show and as the headlight is so large, he decided to conceal it in there. Various holes were also drilled into the frame to feed cables through and after finally figuring out where to put the battery, the frame was sent away to be stove enamelled along with all the other bits and pieces that were also ready to go.


Then when all that was underway, he turned his attention to the leaky engine. Apparently the bike had been sent to a company to have the engine stripped, vapour blasted and rebuilt, and although it looked clean enough in places, it clearly hadn’t been rebuilt well, especially the top end. That was discovered when Simon was cleaning up the contaminated areas and soon noticed it’s where all the leaks were coming from, so suitable replacements were purchased and the top end was stripped. This revealed that the rubber seals between the barrels to the cylinder heads were old and hadn’t been changed in quite some time, if at all, so they were all replaced along with any other gaskets, and after a couple of nights on the spanners, the engine was complete.
The cam side casing also had an EMD over cover on it which gives it that vintage look, which had been polished at some point. Then after looking at EMD’s website, it became apparent that there was a primary side casing available for it too, as it was the first of the five-speed Evo gearboxes. So a quick phone call to Nathan explaining there was a case available for his engine and did he want it? He did, but he wanted it with the shot blasted look on both sides, which meant it was the first time Simon has ever had to take a pair of casings to a polisher and ask him to make them look the same. Harry at Briteworx said, “So you want them both polished?” to which Simon explained that he actually wanted them to look shotblasted the same as the newly purchased primary cover. Harry scratched his head and said, “Well that’s a first, leave it with me!” A week later Simon got a call letting him know the frame and associated parts were ready to pick up, and within in a couple of hours Harry then rang to say the casings were also ready.
Armed with a load of newly refurbished parts it was time to start the rebuild. The first thing was to get the engine back in. And considering it was so tight to get out, Simon knew that trying to refit it without scratching anything was a nightmare, and found it was easier to lower the frame over the engine instead. With it all sorted and now sitting in the frame, it was time to get it back on its wheels, but considering the front end parts were still at the chromers, it was going to have to be a monocycle for a while. But after fitting the newly built rear wheel with its new drum brake hub along with the engine now in its place, Simon checked out his chain line-up. It was out by 5mm, which meant all the new spacers needed to be remade or at lease altered to allow it to line up correctly, and by the time he’d done all this, the platers rang to say that all the chrome parts were ready for collection.
So it was now time to rebuild the springer front end which had been re-enamelled and re-chromed. The forks were slipped into the frame before he proceeded to fit the front wheel, which didn’t need any modifications apart from cleaning and re-greasing a few pivots. And now, with the bike starting to take shape, Simon then wired it all up internally through the frame.
And considering Nathan wanted it to look old school but not like many of the other Harley bobbers out there on the road, they went for an old 30’s/40’s board racer with a twist. First up Simon decided to introduce some brass accents into the mix to give it a contrast between the black and alloy. Next the oil tank was fitted and plumbed in using braided lines with black anodized fittings and although the tank was nice, it didn’t fit very well, so a little fettling was required, and for it to sit right, he made a brass knurled knob to secure it. He even made a matching choke knob to match. Finally, the Lithium-ion battery was fitted and his mate Gruff, who works with leather, made a nice cover to suit the design he was going for.
Turns out the last big job were the handlebars. Keeping with the theme, Simon wanted the old school style drop bars, so some internet surfing was required, and he eventually found some bars from an old TR5 Triumph, which when flipped upside down fitted the bill perfectly. And as he always likes to keep the front end clean of cables, Simon fitted an internal throttle along with a Motogadget Canbus set up on all the switches which meant he could conceal all the cables inside the bars, leaving just the clutch and brake cables exposed.
Now that it’s all finished and with its very proud owner, Simon’s ready for his next project, and says that if anyone else wants a bike built, they can bugger off…
Check out our LiveToRide magazines for more exciting information and keep your passion for riding alive always.